The following information is taken from the AY Honor for Knot Typing in the Seventh Day Adventist Pathfinder guidelines for this honor. The information is what they suggest to follow while learning the knots. I Mr. D will be adding additional helps to the guidelines that need to be done to meet the requirements of this honor.
It's a good idea to begin this honor with the definitions so your Pathfinders have a working vocabulary of the various terms involved.
Telling them to "make a bight" or "take the standing part" makes little sense until these terms are understood.
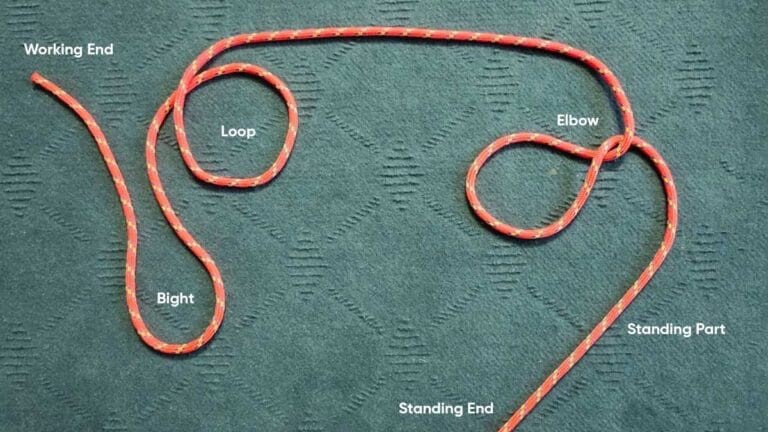
Bight
The term bight is a curved section or slack part between the two ends of a rope, string, or yarn. A knot that can be tied using only the bight of a rope.
Internet Comments about Bight
Sources differ on whether an open loop or U-shaped curve in a rope qualifies as a bight. Ashley (1944) treats bights and loops as distinct, stating that a curve "no narrower than a semicircle" is a bight, while an open loop is a curve "narrower than a bight but with separated ends". However, The Illustrated Encyclopedia of Knots (2002) states: "Any section of line that is bent into a U-shape is a bight."
Running end
Also called the working end, it is the free end of the rope. This is the end of the rope in which a knot is being tied.
The working end is the shorter, active part of the rope that is used to tie knots or perform tasks.
It is the end you manipulate to create loops, bends, or other configurations.
Standing part
The part of the rope between the Running end and the Standing end (the end that doesn't move, think of it as if someone is holding it)
Standing End
This is the longer, inactive part of the rope that does not move when tying knots.
It is often referred to as the "bitter end" and is used to anchor the rope or secure it to an object.
Underhand loop
A loop formed by passing the running end of a line under the standing part.
Internet Comments about Underhand loop
An underhand loop is a type of knot where the working end of the rope is placed under the standing part of the rope. This creates a loop that can be passed through a bight of the standing part to form a bight loop. The underhand loop is often used in various knots, such as the bowline knot, where it helps in determining the position of the tail end inside the knot.
It is also a fundamental technique in rope tying, providing a way to create a running loop when a bight of the standing part is pushed through the loop. The underhand loop is essential for tying knots that require a specific orientation of the tail end, such as the bowline knot, where the tail end is typically inside the knot.
Overhand loop
A loop formed by passing the running end of a line over the standing part.
The Knot Manual quotes
The Overhand Loop Knot is a simple and reliable knot that creates a fixed loop at the end of a rope or line. This knot works well in many different situations when you need a loop that won’t come undone. It’s commonly used in various outdoor activities, such as climbing, camping, and fishing, due to its ease of tying and versatility. This simple and reliable knot is a go-to option for creating loops that won’t slip under tension.
Turn
A: Turn
B: Round turn
C: Two round turns
A turn is a component of a knot. Turns can be made around objects, through rings, or around the standing part of the rope itself. Turns come in various forms, distinguished by the number of passes that the rope makes.
A turn or single turn requires one pass. The line makes a U-shape through or around the object, or half a revolution. A round turn requires two passes and makes one and a half revolutions. Two round turns adds another pass and revolution.
Bend
A bend is used to tie two ropes together, as in the Sheetbend. Technically, even the Reef knot is a bend
Internet Comments about Bend
A rope bend is a type of knot used to join two lengths of rope. Bends are commonly used in various applications, including climbing, sailing, and securing loads. They ensure a secure connection between ropes, allowing them to support weight or transmit force. Common types of bends include the sheet bend, double fisherman's knot, and the double figure-eight bend, each with its own advantages in terms of strength and ease of use.
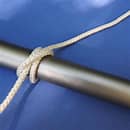
Hitch
A hitch is used to tie a rope to a spar, ring or post, such as the Clove hitch. Hitches can also be used to tie one rope onto another rope, as in the Rolling hitch.
Internet Comments about Hitch
A rope hitch is a type of knot used to secure a rope to an object or another rope.
Hitches are essential for various applications, including climbing, sailing, and securing loads. They are classified based on their ability to be tightened or released, their resistance to slipping, and their strength.
Common types of hitch knots include the clove hitch, timber hitch, and round turn and two half-hitches, each designed for specific tasks such as hoisting, climbing, or securing loads.
Splice
A knot formed by interweaving strands of rope rather than whole lines. More time consuming but usually stronger than simple knots.
Internet Comments through Wkipedia about Splice
Splicing is the process of joining two ropes together or forming a semi-permanent joint within a single rope.
Form a stopper at the end of a line.
Create a loop or an eye in a rope.
Splice shorter lengths of rope together to form a longer length
Terminate a rope without using a knot.
Whipping
A binding knot used to prevent another line from fray.
Lay the twine along the rope and make a bight back along the rope.
Wrap the twine around itself and the rope.
Wrap it until the desired length is achieved.
Pass the working end through the loop.
Pull the lower end of the twine until the loop reaches midway and trim off any excess twine.
Rope whipping is a technique used to secure the ends of a rope to prevent fraying and unraveling. It involves binding the end of the rope with a specialized twine, which helps maintain the integrity of the rope and extends its usability.
Common Whipping: This is the simplest method, where a loop of twine is placed at the end of the rope, and the twine is wrapped around the rope to prevent it from unraveling.
Uses: Whipping is commonly used in sailing, camping, and outdoor activities to preserve ropes and prevent damage.
Methods: There are various whipping methods, including the Common Whipping, West Country Whipping, and Sailmaker’s Whipping, each suited for different types of rope and applications.
Whipping is a practical and effective way to ensure the longevity and functionality of ropes in various situations.
Added terminology based on Master Guide Mr. D
Eye
The eye is a loop formed in the rope, which can be used to create a fixed connection. It is important for securing the rope to other objects without slipping.A binding knot used to prevent another line from fray
Internet Comments through Wkipedia / Eye / Eye splicing
The eye splice is a method of creating a permanent loop (an "eye") in the end of a rope by means of rope splicing.
A rope eye, also known as an eye splice, is a method used to create a permanent loop (an "eye") at the end of a rope. This technique involves splicing the ends of the rope together to prevent fraying and ensure a secure connection.
Eye Splicing: This method involves tucking the ends of the rope into the standing end to form a loop, which is essential for creating a strong and durable splice.
Techniques: There are various techniques for creating an eye splice, including using tape to bind the strands temporarily and ensuring a minimum number of tucks for different types of rope materials.
Applications: Eye splicing is commonly used in nautical, sailing, and boating contexts, as well as in rigging and climbing ropes, to create secure connections.
Spoke
In the context of roping, the spoke refers to the distance between the eye of the rope and the roping hand. It affects how the rope feels during use.
Internet Comments about a Spoke
A rope spoke refers to the section of a rope that is used in various applications, particularly in team roping. In this context, the spoke is the distance between the eye of the rope and the hand holding the rope, which affects the feel and performance of the rope during a swing. Understanding the spoke length is crucial for effective roping, as it influences how the weight of the rope feels and how well it feeds into the loop.
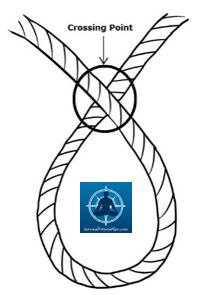
Crossing Point
This is where two parts of the rope cross each other, which is essential in forming loops and knots.
Internet Comments about Crossing Point
The crossing point in rope knot terminology refers to the place where the ropes cross in the making of a loop. It is the point where the working end of the rope lies over the standing part, creating a loop. This crossing point is crucial in knot tying as it determines the structure and strength of the knot. Knots that can be tied without access to either end of the rope are called knots in the bight, and tying a knot with a bight is to double up the rope into a bight and then tie the knot using the double rope.
Elbow
An elbow occurs when two or more loops are created in close proximity to each other, often seen in complex knot configurations.
Internet Comments on a rope Elbow
An elbow in rope terminology refers to two or more loops in close proximity to each other. It is created when an additional twist is made in a loop, resulting in two or more crossings of the rope. This term is commonly used in knotting and rope handling contexts.
Please listen to the Video for the needed information for the steps to follow.